Links
Fay Marine Photographs 6
![]()
The hull is nearing completion and is about half welded. To minimise distortion the seams are welded in 2" to 3" (50mm to 75mm) lengths, moving a few feet away before making the next weld. When I build a steel yacht I fit all the plate closely without leaving a weld gap. When all plates are in position I go inside and still only welding 2" or 3" at a time fully weld all the seams with a light weld. Then on the outside I use a 3mm thick cutting disk in the angle grinder to 'V' out the seams back to the internal weld. Then, when I weld the outside I know that I have perfect penetration. Some yards don't go to these lengths, but that is up to them.
In this photo the transom shape is being cut, prior to having the round bar, used to cap the toe rail, extended around the transom. A short section of the toe rail cap can be seen protruding. This will be heated and bent around the plate before having the next section added to it.
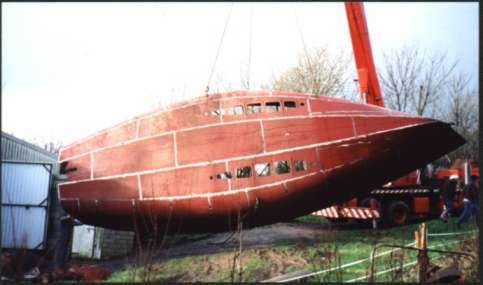
Our most recent 40ft hull being turned over. All the seam welds have been ground flat and can clearly be seen. I always build from pre-blasted and primed steel as this is cleaner and saves a lot of work later. On the inside most welds are wire brushed and re-primed. The seams on built in steel water and fuel tanks are re-blasted, as are any sumps or anywhere water may lay. On the outside the welds will be re-grit blasted carefully and the whole hull 'washed over' and the holding primer 'refreshed' by using the grit blaster from a couple of feet away.
The lugs for the crane to use to turn the hull over are cut from scrap 1/2" or 3/4" plate and welded on where there is a frame. On the inside extra braces are welded from the headstocks to support these lugs.
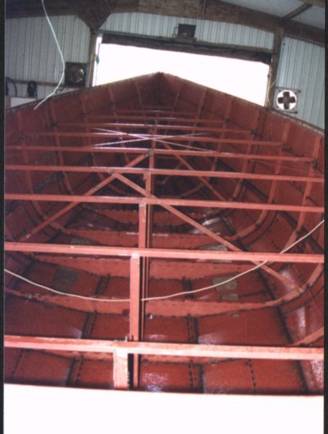 Turned
over and nearly ready to have the deck fitted. On this yacht the keels
still needed fitting, but on most designs this will already be part of
the hull.
Turned
over and nearly ready to have the deck fitted. On this yacht the keels
still needed fitting, but on most designs this will already be part of
the hull.
At this point the engine beds, tanks, bulkheads and any other internal steel work is easy to complete.
The temporary supports to the points where the lifting lugs were attached can be seen.
The headstocks can have plywood or planks laid across them to form a staging, to make working on the deck construction easy.
All welding shrinks and at this point the builder may be alarmed to find that the headstocks no longer line up. Often during the welding process the hull will slightly curve, lifting off the temporary building frame at the bow and stern. This is caused by the cumulative effect of all the weld shrinkage. This is partly why all welding is made in short runs. Short runs minimise the heat input and the surrounding cold steel helps to minimise the shrinkage. Even with great care there will be some distortion. However what happens in practice is that when the deck is plated and fully welded this also shrinks and will tend to pull the hull back into line. So do not to worry about a little movement.
I am often asked about 'MIG' welding and the claims that it doesn't shrink as much as stick and is faster. In practice it will cause almost as much distortion as stick and the weld runs will still need to be kept fairly short. However it will be faster on the outside welds. The real negative is using it in the real world. I had the advantage of being able to test lots of different gear and good quality MIG was one of them. I found that the biggest disadvantage was having to lug a small, heavy suitcase sized box around wherever I wanted to weld, especially clambering around inside a hull with all the temporary supports to be climbed over. Here a long cable to a stick welder is what I prefer.
In the last few years the small 'inverter technology' welders have come onto the market. These are marvellous machines. They are very small and most come with a shoulder strap so that it can be carried around while you are welding. They weld DC which is much nicer than AC and most have a scratch start TIG setting which can be used for welding stainless steel. All that is needed is a kit to be able to use the gas. I have an expensive water resistant version rated at 90 amps continuous, 130 amps maximum. I can not put welding rods into the holder fast enough for it to overheat and cut out. I also have a fan assisted AC welder rated at 250 amps Max which will only run at 100 amps for about 10 minuets before cutting out. So apart from my big heavy oil cooled welder, which I have now sold, I really think the inverter technology welders are the way to go.
©Paul Fay 2004