Links
| Please donate if you find this site useful. |
| Fay Marine |
| Yacht Plans |
| Anchors & Anchoring |
| Batteries |
| Battery Desulphation |
| Diesel Fuel |
| Electricity |
| Engines |
| Free Fire Design |
|
|
|
|
Yacht legs
A Simple inexpensive solution
Pictures at the bottom of this page
I lived and worked in the town of Bideford in North Devon UK for many years. Bideford has the Torridge river running through it which is a tidal river and dries almost completely at low tide. The centre of the river is sandy and the edges are soft mud.
Keeping a yacht here gives you several choices. When the tide recedes you can let the yacht fall over onto its bilge which I have done on mud without any problems, except being telephoned by concerned friends for the first few days.
Or you can have a twin or bilge keeler or lifting centre plate type, or you can use legs to keep her upright.
We now have a twin keeler but for many years kept several different yachts on our mooring, using legs to keep them upright. I never had a problem with any of them. The only time there was ever a problem was when a new owner did not splay the legs out allowing them to tuck in under the bilge which allowed the yacht to go over on its bilge at low tide. This was in mud and therefore the only problem was an uncomfortable night’s sleep.
I have often been asked about the type of legs that I used and so here is the information that I have learnt over the years.
I mostly kept the yachts on a mud berth which gave a very gentle landing as the yacht dried out but have also occasionally dried out on sand which is much harder on the legs and gear.
The size of legs that I have used in both the very soft mud and hard sand around Bideford were all tube capable of supporting the boats weight on one leg alone.
I always used galvanised steel tube but with the falling cost of aluminium this is becoming a better choice.
If you decide to use aluminium then it must be grade 6061 T6 aluminium tube and twice the wall thickness of the steel. This is both strong and very corrosion resistant.
Aluminium tube will be about 2/3 the weight of steel tube and be easier to handle, work with and not cause as much corrosion stains etc.
Square tube can also be used which is slightly heavier but also stronger. Square may be easier to drill and fit a foot onto.
Here are the rough sizes of galvanised
steel tube to use which depends on the length from toe rail to bottom of
keel and the weight of the yacht. When purchasing the tube add several
feet to take the tube well above the deck.
30ft 6 ton yacht with 6ft long legs = 60mm O/D x 4mm wall tube.
35ft 8 ton yacht with 8ft long legs = 76mm O/D x 4.5mm wall tube.
40ft 11 ton yacht with 9ft long legs =
90mm O/D x 4.5mm wall tube.
If you need different sizes then I
suggest looking at Ian Nicolson’s book ‘The Boat Data Book’ which gives
a table of loads for circular hollow sections (tubes) and also for
square sections. You can work out the length and loads from this table.
The size of the bolts can be difficult to judge so here is a rough guide.
Normally the tensile strength of a bolt can be found. The problem is that what we want is the shear strength.
In practice the shear strength for a high tensile 8-8 or grade 8 bolt is roughly 60% of the tensile strength.
For stainless the shear strength is roughly 55% of the tensile strength.
Also the strength will be slightly reduced if you fit a loose spacer to help hold the leg away from the hull.
I always used 8-8 high tensile galvanised steel bolts, replacing them every few years when the thin electro plating galvanising failed and they began to rust. This is because this type is considerably stronger than stainless as the following shows.
These are the approximate shear strengths for 8-8 bolts on the shank not the threaded part. taken from the Nucor Fasteners technical sheet.
1/2 inch (12.7mm) = 17000 1lbs ( 7727kg) (7 tons)
5/8 inch (15.9mm) = 27000 lbs (12272kg) (12 tons)
3/4 inch (19mm) = 39000 lbs (17727kg) (17 tons)
These are the approximate shear strengths for stainless bolts on the shank not the threaded part taken from Dave Gerr’s book ‘Boat Strength’.
1/2 inch (12.7mm) = 8831 lbs ( 4006kg) (4 tons)
5/8 inch (15.9mm) = 13800 lbs (6260kg) (6 tons)
3/4 inch (19mm) = 19870 lbs (9013kg) (9 tons)
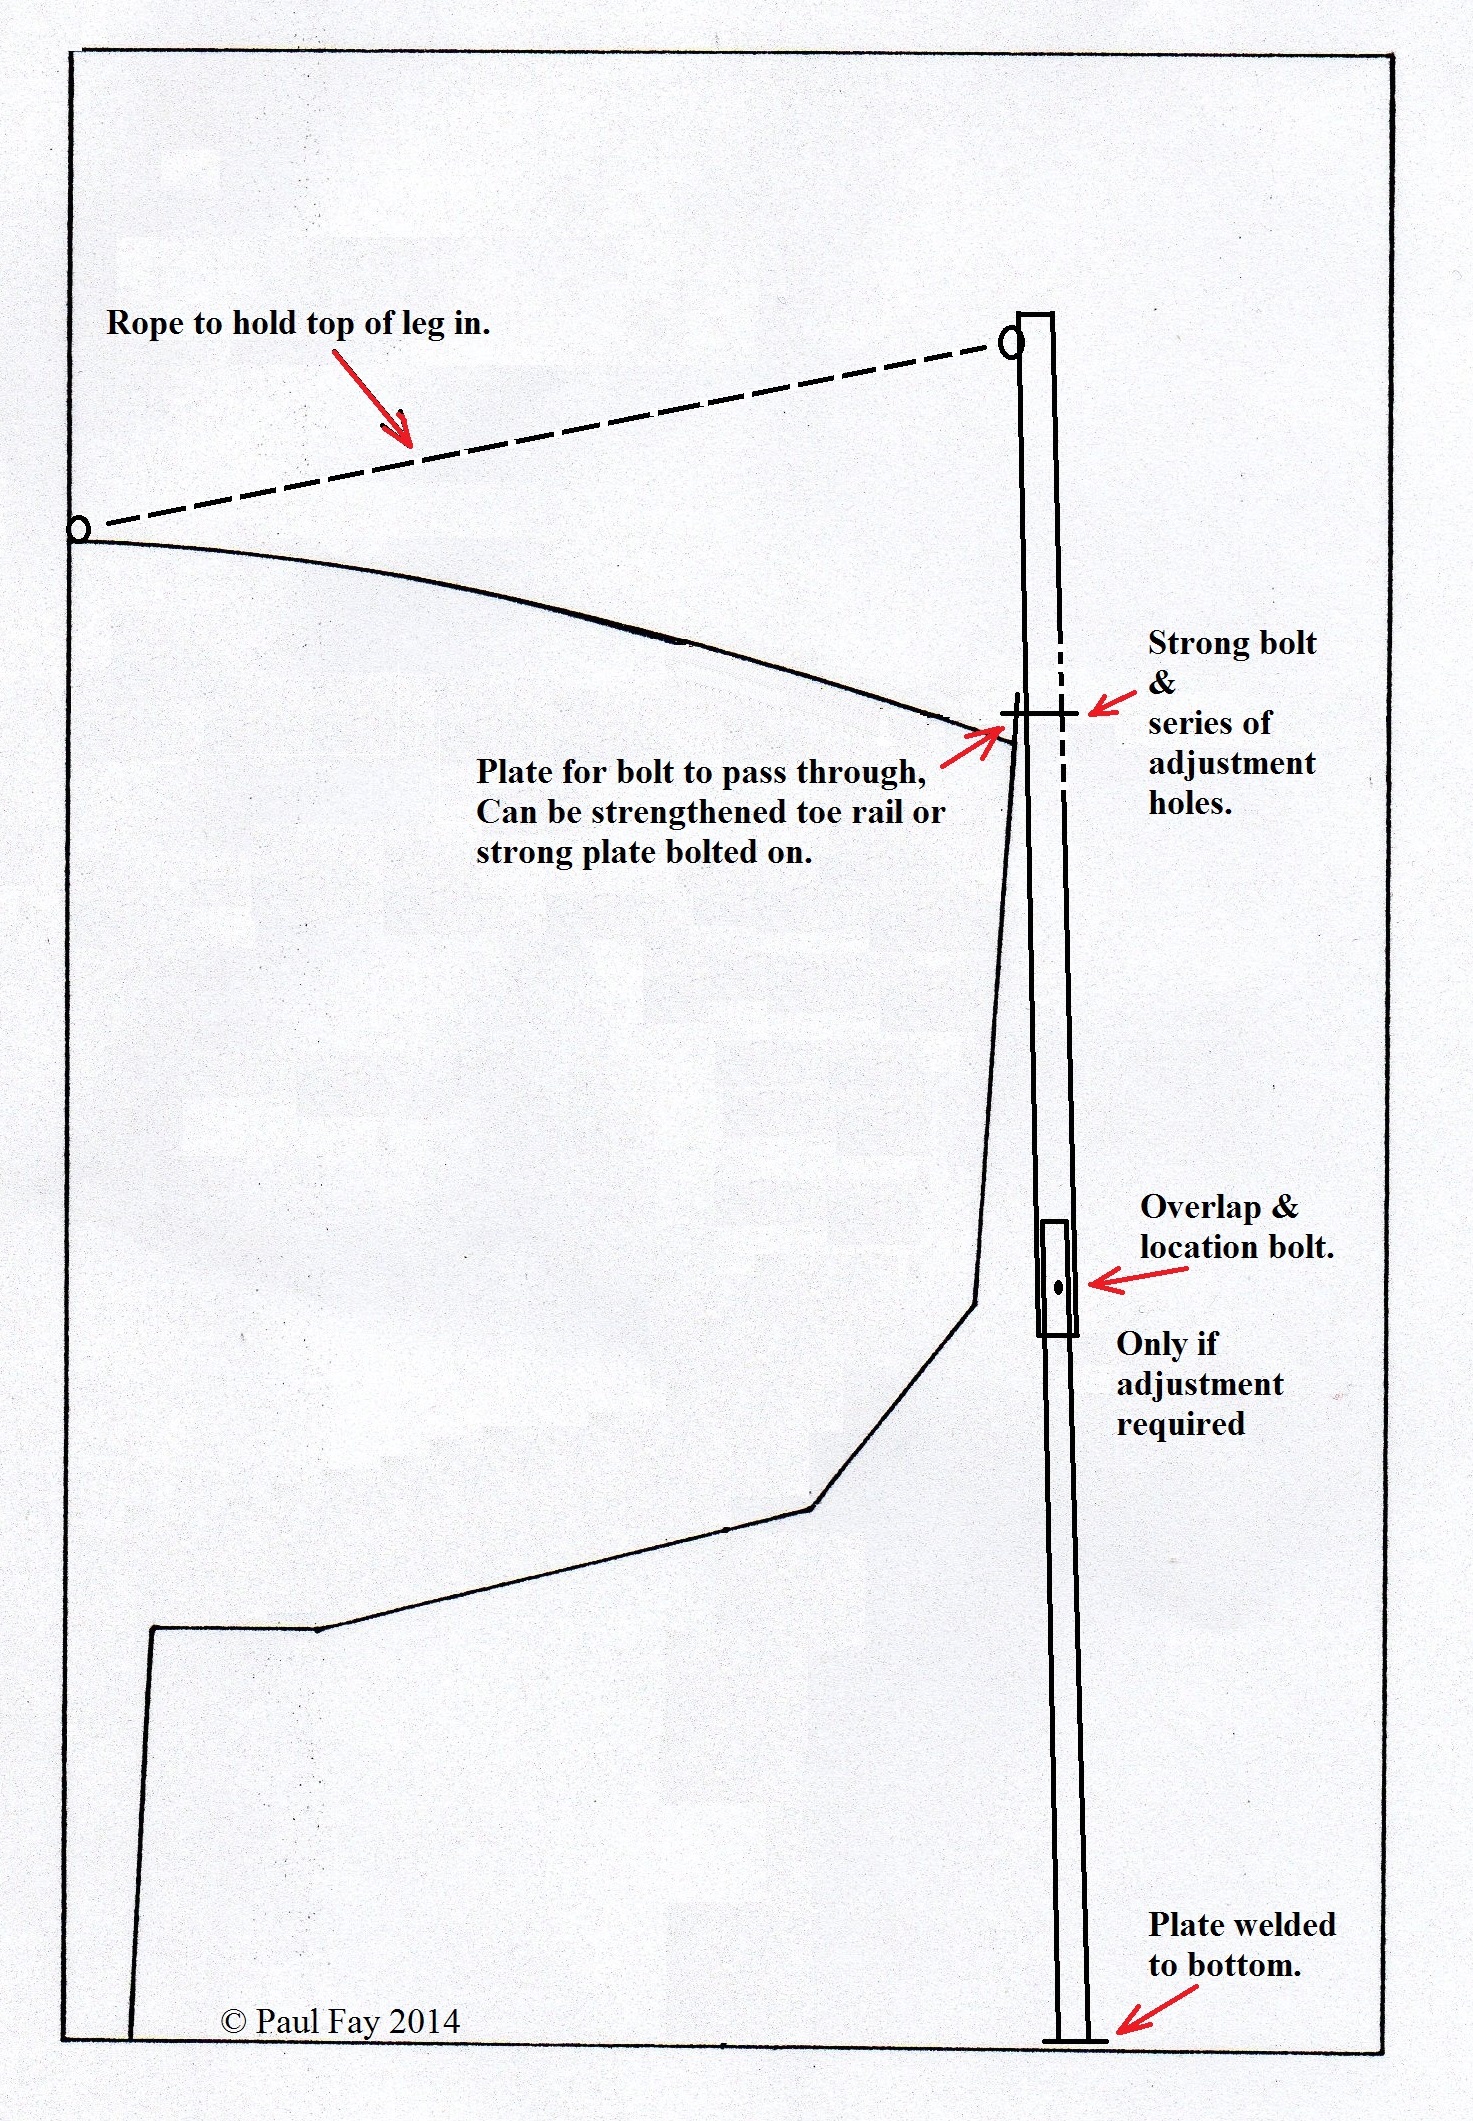
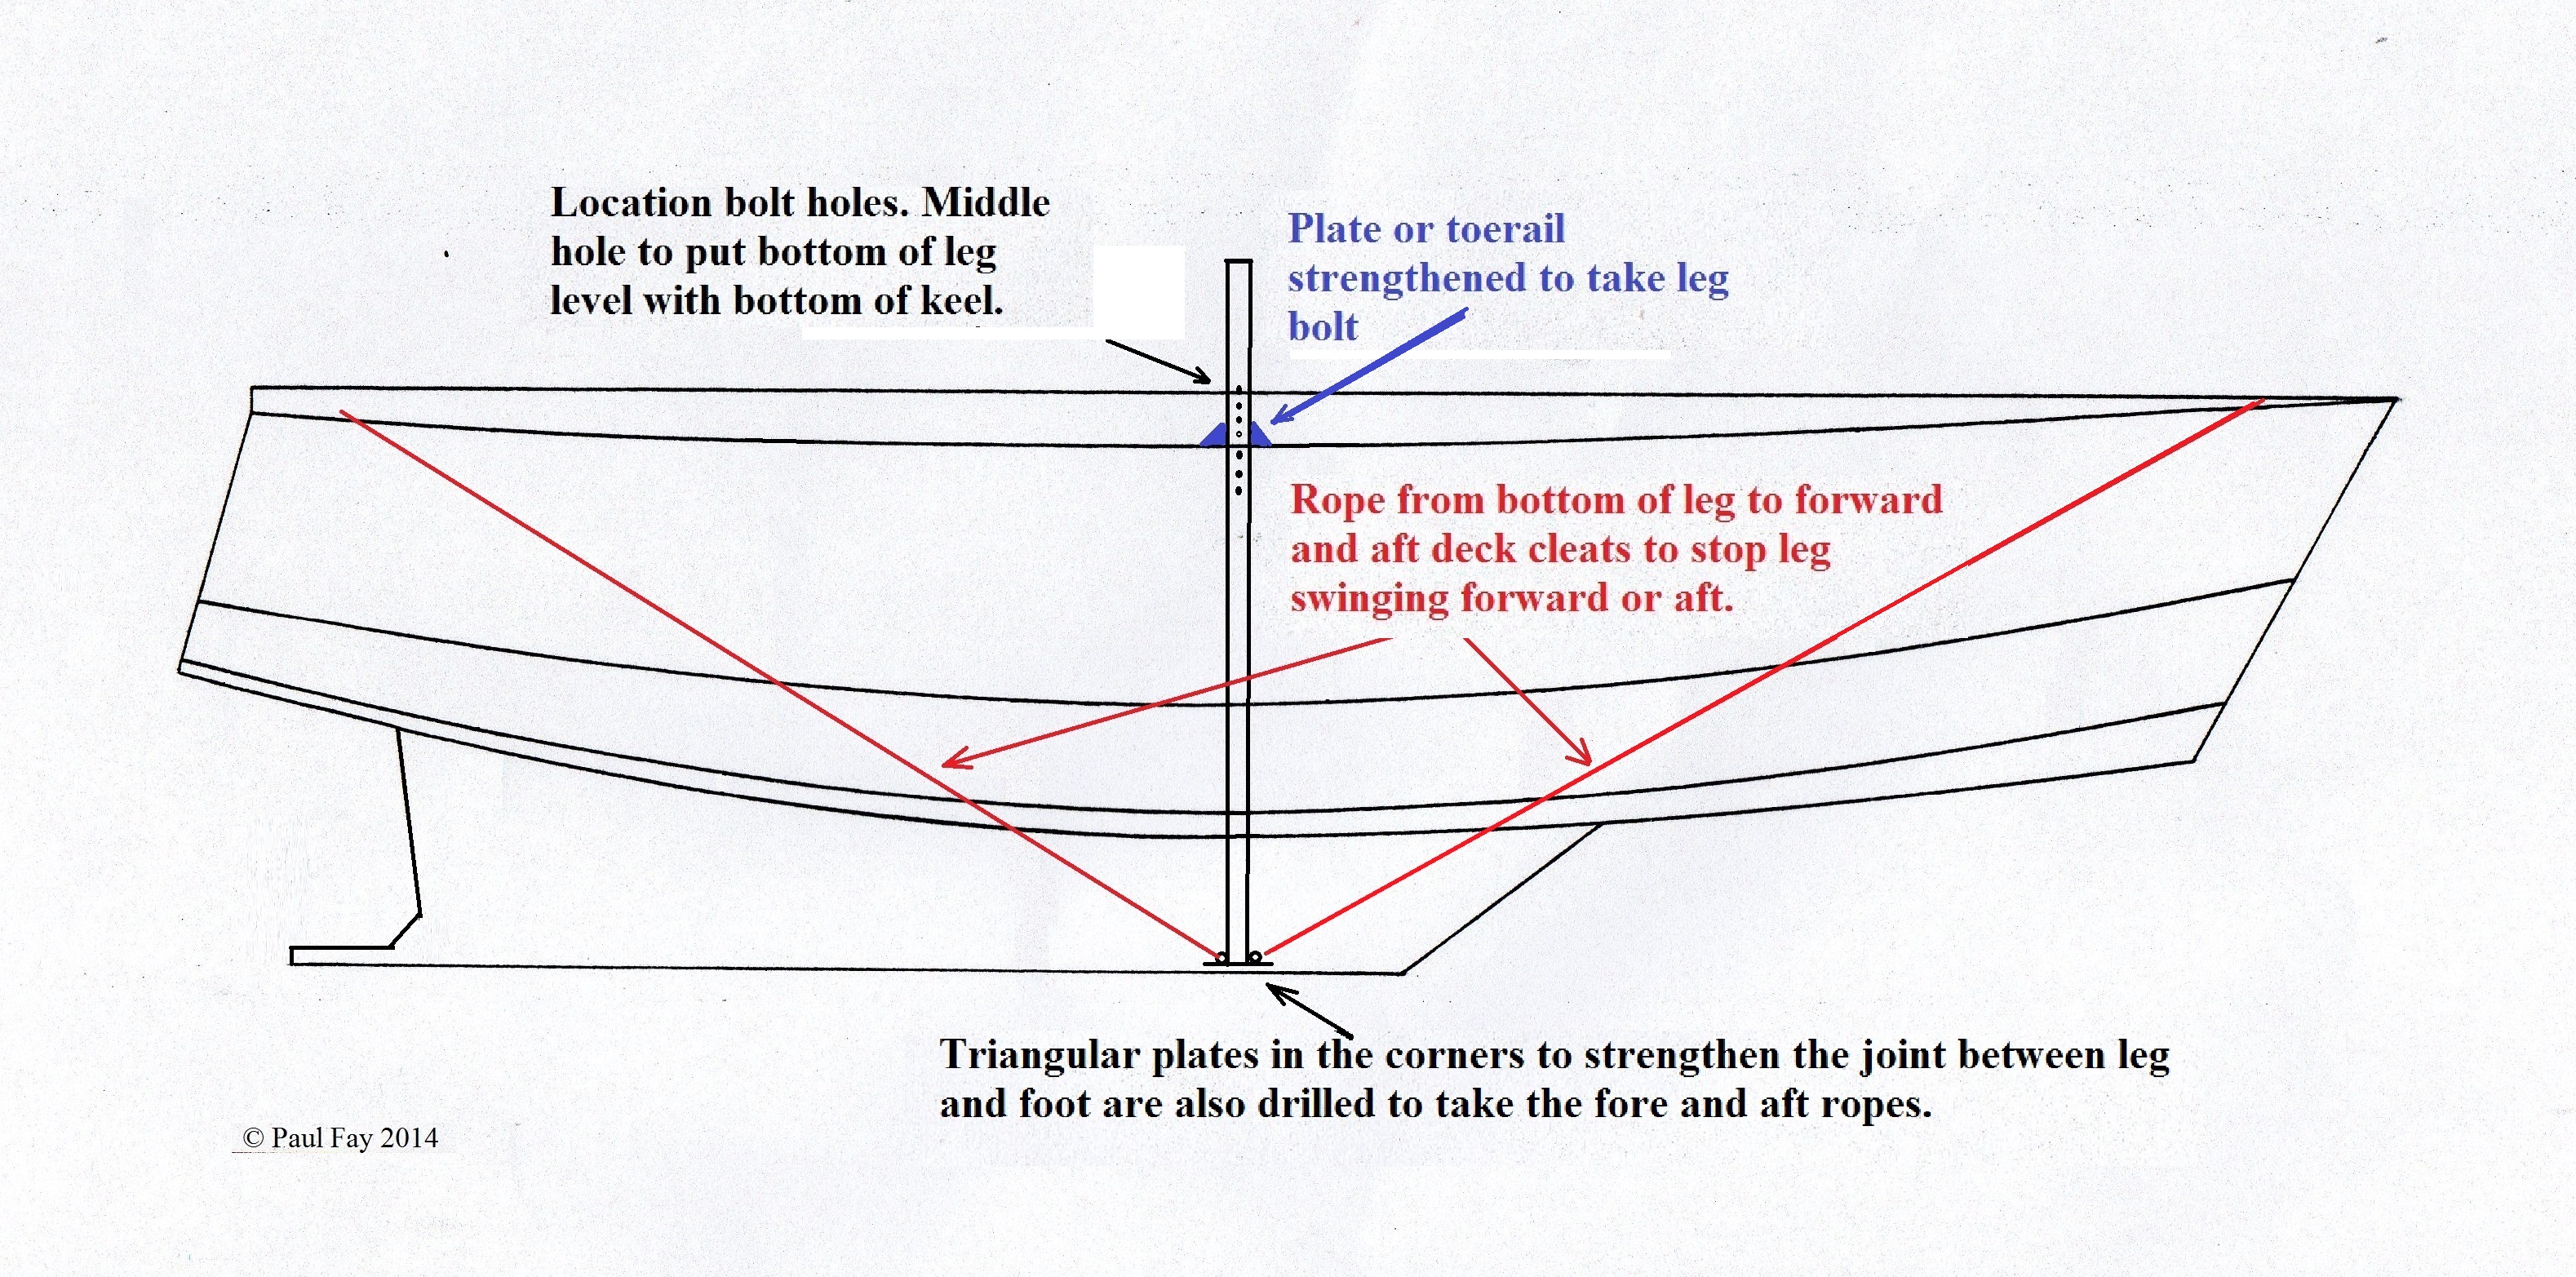
Where the legs fitted to the deck plate I drilled a number of holes 3ins apart so that I could adjust each leg up or down to suit the angle / slope of the ground where the yacht was drying out. The middle hole was correct for the boat to stand upright on flat ground. I had a spacer between the deck plate and the leg of about 1/2 inch to allow the leg clearance from the topsides. (I actually used several washers). Welding a spacer on would be best as this would not reduce the strength of the bolt.
The yachts which I kept with drying out legs were all constructed from steel and either had a strengthened steel toe rail or a 10 or 12mm plate welded on for the bolt to pass through. If you want to fit legs to a GRP, wood or ferro cement boat then a strong plate will need to be bolted on. The load will need to be well spread with substantial reinforcement inside to back the plate up. If you have a yacht with bolted on chain plates for the rigging these can give a guide to the size and number of bolts as the ‘rule of thumb’ for rigging is that the rigging on one side of the mast should be capable of lifting the weight of the yacht. But don’t trust this with some of the modern very light weight yachts around.
The foot on the bottom can be round or rectangular. The rectangular ones I used were about 12ins long and 6ins wide made from 6mm plate with triangular strengtheners onto the leg tube. Rectangular is generally easier to store.
I always took the leg well above the deck and used a short length of rope from the top of the leg to an eye in the middle of the deck. I used this to pull the top inboard which splayed the leg out at the bottom. This considerably increases the distance between the keel and the bottom of the leg increasing the support angle (and therefore the stability) by several feet. Doing it this way means that there is no bending load on the middle of the leg as there would be if a pad was fitted to push the leg out from the lower topsides. Also by using the rope method, when drying out and surging around this reduces any strain trying to bend the leg. An added bonus is that there is nothing to mark your topsides.
I also fitted ropes from the bottom of each leg going forward and aft up to a cleat on the deck to keep the leg roughly upright. These do not need to be very tight.
I never put a joint in the leg to enable it to shorten for storage but it should be easy to either have the leg in two halves with an insert type joint or it will be better to find two sections which will telescope. In the case of telescoping I would go for a slightly larger top tube. The tubes should be checked for fit as some will have a weld line inside which will stop a very close fit but a mm or two clearance shouldn't matter. I would make them overlap by 18ins or so with a simple bolt / pin the same diameter as the deck bolt to locate them.
When sailing short distances to an anchorage I would simply pull the legs up and leave them attached alongside, ready to drop again when I returned to my mooring. This will be difficult if you are going to a marina or somewhere where you will lay alongside a wall.
I did occasionally get it a bit wrong when drying out in a new place for the first time but as each leg is strong enough to support the weight of the yacht, then leaning over a bit for a tide did not matter much.
With the latest costs, I would think that aluminium would be by far the best as 6061 T6 is very corrosion resistant - lighter and easier to work with and if you make them yourself should only cost a fraction of the purchased versions.