Links
| Please donate if you find this site useful. |
| Fay Marine |
| Yacht Plans |
| Anchors & Anchoring |
| Batteries |
| Battery Desulphation |
| Diesel Fuel |
| Electricity |
| Engines |
| Free Fire Design |
|
|
|
|
|
Fay Marine
SELF STEERING FOR YACHTS
Basic principles of four types by Paul Fay.
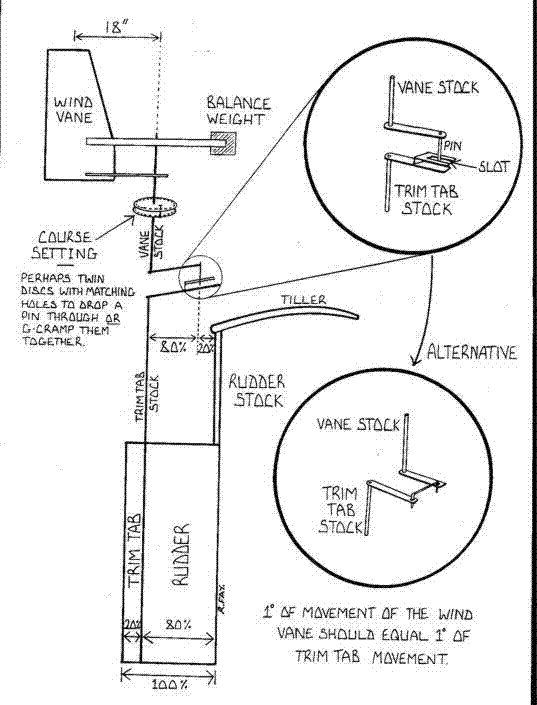
I have seen and often modified wind vane controlled self steering gears that have been owner built. Although well constructed many of these units did not work well, This was because there had been little understanding of the basic principles that must be adhered to. In this paper I set out the basic dimensions and geometry of the four most common types built by the home constructor, these are:- Vertical vane to trim tab, Horizontal vane to trim tab, Auxiliary rudder and also the Pendulum servo. This will guide the owner to construct a wind vane self steering unit that can work as well as any proprietary model. I suggest that all four methods are examined as there are common rules that apply to all types and after a little consideration, it may be found that one of the simpler methods is best for your yacht. The drawings are clearer if downloaded to your computer and opened in Windows picture and fax viewer. ………………………………………………………… There are all types of self steering gears manufactured, from the simple wind vane direct to tiller type, to the complicated wind vane to pendulum servo which then drives an auxiliary rudder. It is not only the complicated linkage that gives one a headache but it is also the price tags that run into thousands that can hurt. The practical sailor will therefore be asking himself:- What type will suit my yacht? How much will it cost? Can I make one for myself? Will it work in a reasonable fashion? The answers to these questions are :- Yes, any sailor with basic practical skills can make one for themselves. They can successfully be built entirely from wood, simply using bolts and dinghy fittings as pivots. With simple metal working tools and a welder, an extremely strong low maintenance system can be built. One of the secrets is to keep it as simple as possible. Yes, it will work well so long as a few basic principles are adhered to. A wind vane does not steer a compass course quite as accurately as an electronic autopilot, but even in awkward conditions such as when running in a disturbed sea, should only allow the yacht to wander 10 or 15 degrees maximum. Some people worry about this, but, if you actually work out how much this adds to a passage you will see that it is negligible. An advantage of wind vane controlled steering gears over electronic types, is that on a long passage once the sails are set, the wind vane will follow any small changes in wind direction. This means that it is easier to keep the yacht sailing at it's optimum without constantly re-trimming the sails. The cost can be virtually nothing if scrap materials are used, or, if all the materials are bought new should only cost a fraction (Perhaps 5%) of a manufactured system. If you are buying or building a new yacht on which you intend to fit a wind vane steering gear then consider the design of the yacht carefully. On any short handed yacht such as one sailed by a family, the ability to easily steer itself is very important. This frees the crew from the tyranny of having to helm for long periods. If a wind vane system is used rather than relying on an electronic type then running the engine for battery charging will be kept to a minimum. A reasonable wind vane self steering unit will steer in winds as low as force 2 when the vessel is likely to start motoring anyway. This means that the only time that an electronic self steering system is necessary, is when the winds are light. Under these conditions an electronic unit, considerably smaller than normal will suffice. SUITABLE TYPES Yachts broadly fall into two categories, those with inboard rudders and those with transom hung rudders. On a yacht with an inboard rudder there are three basic choices. If she is very small and exceptionally well mannered then a simple wind vane to tiller may work, but they are seldom successful so I will be ignoring them. The other two choices are pendulum servo to drive the main rudder, or one of the auxiliary rudder types. A yacht with a transom hung rudder may use any of these steering gears. However, on a yacht of this type, using any system other than a trim tab on the main rudder, appears to be an unnecessary complication. DESIGN PRINCIPLES The materials available, your own expertise and your tools will determine the exact design. The problems that occur with many self made gears, are normally caused because the builder did not understand the basic principles. These are vane, trim tab, pendulum and auxiliary rudder size. The geometry of the parts and the little understood principle of 'feed back'. READ ON, you don't need to understand any of them!! If you are an engineer and want an in depth understanding there are several books available which explain it all in great detail. Most yachtsmen don't require this, so in this paper I simply describe the systems that a home builder can produce giving sizes and measurements, without delving deeply into the design principles. The sizes quoted, are for average 30 to 40 foot yachts and can be increased or decreased as necessary. The geometry must be closely followed for them to work. The easiest system to build is the first (design 1) increasing in difficulty until finally the last (design 4) is the most difficult. THIS TEXT SHOULD BE READ WITH THE DRAWINGS ALONGSIDE TO MAKE THINGS CLEAR CLICK ON THE THUMBNAIL FOR A PRINTABLE PICTURE VERTICALLY PIVOTED VANE TO TRIM TAB (Design 1)
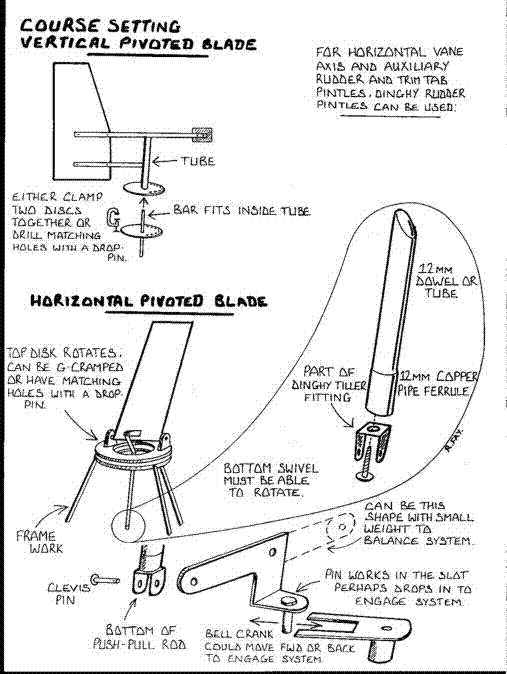
This is a very simple gear to construct and control. The yacht will wander a little more than if a horizontally pivoted blade is used, but it is more than acceptable and is favoured by many long term ocean voyagers because of it's simplicity and ease of use. GEOMETRY The linkage should transfer one degree of vane movement into one degree of trim tab movement. It should act 80% forward of the distance between trim tab pintles and rudder pintles. This is very important to provide 'feed back', which stops the system over steering. (This actually means that when 15 degrees of trim tab is applied, the rudder will move 15 degrees and at this point the rudder and trim tab will realign, so exerting no more force). If the two sets of pintles are not parallel, (i.e. if a line extended vertically through both sets of pintles will meet at some point above the yacht) then the linkage should act 80% forward of the aft pintle line, wherever the trim tab tiller is fitted. The air vane should be as large as reasonable. A shaped blade cut from 4' by 2' by 4mm (3/16") plywood is often used, (This size of blade will also suit considerably larger yachts). The centre of this should be 18" behind the pivot point. On the opposite side of the pivot there must be a weight to balance the vane around its axis. This means that if the blade is laid horizontally on one side, only supported by the pivot point, the weight shown in the drawing exactly balances the weight of the blade. This stops the blade swinging due to gravity as the yacht rolls. The vertical tube that carries the air blade will need to have a diameter of at least one inch to be strong enough and this can be considerably greater without adversely affecting the performance, due to inertia. A method of course setting between the vane and the rest of the linkage must be provided. There are several methods of achieving this but one of the simplest is to use two discs that can be locked together to start the system. They can either be locked by using holes around the edge that a pin drops into, or a type of 'G' cramp can be employed. With the locking pin removed or the clamp released the vane is free to 'weathercock' into the wind when the system is not in use. As it is unlikely that the linkage will be able to accommodate the large movements of the rudder during manoeuvring, there needs to be a method of disconnecting the linkage from the trim tab tiller. This is not only the easiest steering gear to construct, but is also the easiest to operate. The trim tab will be 20% or 1/5 of the total rudder chord. This means that if the rudder measures 25 inches from front to rear, the trim tab will be 5 inches. It is best if this is not an addition to an existing rudder, as this will make the rudder oversize and difficult to control. If an existing rudder is being modified, a section of the trailing edge should be removed and either re-used as the trim tab or a new trim tab constructed. The trim tab stock can be made from 3/4 inch stainless bar with lugs welded on. The tab is finished by having shaped plywood sandwich the lugs. If you are building a new yacht consider partially balancing the rudder by 10 or 15 percent, ( I now use roughly 18%) as this helps it to work easier and is now favoured by many modern designers. The maximum balance used on a sailing yacht must not exceed 20%. It may well be worth modifying an existing rudder to improve the performance after checking with a yacht designer. A method of locking the trim tab in line with the rest of the rudder must be provided. This is for when you are hand steering and reversing. A drop in pin or locking clamp can be employed which must lock the trim tab exactly in line with the forward part of the rudder. When locked, the trim tab will need to be accurately aligned with the main part of the rudder, otherwise the trim tab will constantly try to apply helm. Also this locking device must be strong as the loads when reversing can be high. It is reasonably easy to link an inexpensive tiller type electronic self steering to a trim tab. This would give accurate steering with minimal power drain on the batteries. BEARINGS I want to mention the bearings at this early stage, as apart from the design principles, sticky bearings can spoil an otherwise perfect gear. In fact many of the problems experienced with expensive manufactured steering systems after a few years, is caused by debris build up in the bearings and bushes making things tight. The movement of each part of a self steering gear is very small. The only part that has to go full circle is the course setting disk which doesn't need any bearings. I never use any ball or roller bearings in my steering gears. I have found that simple metal to metal, or better, metal to nylon bushes are more than adequate. When I built my first steering gear, which was a pendulum servo type, I originally made all the bearings a good fit, but I found that after a while the movement tended to stick, leading to erratic course keeping. Half way across the Atlantic I dismantled it and ran a drill through all the bearings, making them all quite sloppy. It worked like magic! The water flowing past the blade caused the whole unit to gently vibrate, stopping any tendency for the bearings to stick even in light winds. Since then I have often heard people say that as their bought units get older and more worn they seem to work better. Now when I build a unit I always make sure that there is plenty of 'slop' in the bushes. Because there is little movement between parts it takes tens of thousands of miles to cause any appreciable wear. HORIZONTAL VANE TO TRIM TAB (Design 2)
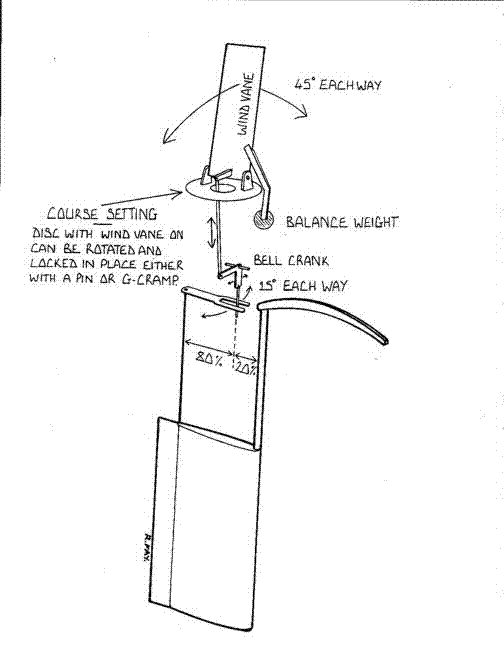
This type is a little more complicated to design, construct and use. The advantages are that it will steer a slightly more accurate course, works a little better in light winds and needs a smaller vane. The air vane needs to be 1 foot wide by 4 feet high and cut from 4mm ply. The blade pivot can be fixed horizontally or can be set at an angle of up to 15 degrees to allow the blade to trail away from the wind. It is advantageous if the blade can be adjusted to either be more upright for light winds, or be angled backwards for stronger winds. This can be achieved in two ways. The first and easiest is to have the air blade attached with one bolt and 'wing' nut at its base. This allows it to be adjusted. The second and very complicated method (not recommended) is to construct the linkage so that the whole pivot assembly is adjustable. A short length of 1/2 inch stainless bar running in plastic bushes, a set of dinghy rudder pintles, and the front wheel hub and bearings from a pedal cycle have all been used successfully as the pivot. The air vane must be able to ' flop over ' 45 degrees and there must be a counter weight just heavy enough to bring it back to the vertical. It is advantageous if the balance weight can be adjusted up and down by a few inches to increase or decrease its effect on the vane in differing wind strengths. A method of rotating the blade must be provided for course setting. This can easily be made by mounting the blade on a disk with a hole in the centre. The disk will rotate on a framework and will need a method of fixing or clamping once on course. This can either be a series of holes with a drop in pin or a clamp. A lever on the side of the blade will operate a push / pull rod which transfers the movement through a bell crank to the trim tab. The air vane must move 45 degrees which must move the trim tab 15 to 18 degrees. (Approx. 3 to 1) It should act 80% forward of the distance between trim tab and rudder pintles. This provides the feed back to stop over-steering. A method of disconnecting the vane from the trim tab must be provided. This is to stop the rudder operating the vane when it is not in use, as this will break the system. For hand steering and reversing the trim tab must be securely locked in line with the main rudder. AUXILIARY RUDDER WITH TRIM TAB (Design 3)
After a transom hung rudder and trim tab, which is often preferred by many long distance sailors as there is very little load on any of the parts, must come the auxiliary rudder. The advantages of this system are that like the transom hung rudder it is acting at the extreme rear of the yacht and so has great leverage. It is a totally independent system and the main rudder and steering gear are locked and therefore are not being worn out. But, things are beginning to become more complicated to design, build and use. This is because we also have to construct a new rudder with pintles and a very strong mounting. Either type of vane may be used, but for the sake of simplicity it is shown in the drawings with a vertically pivoted blade. All the principles of vane to trim tab linkage remain the same. But as we are now dealing with a semi balanced rudder it may be possible to reduce the size of the vane slightly. The best thing is to try it with the sizes quoted, if it proves too sensitive it is much easier to cut the wind vane down, than it is to add extra area. The vane must turn the trim tab at a point 80% forward of the distance between the trim tab and rudder pintles, to provide feedback and stop over-steering. A method of locking the trim tab to the rudder and of locking the rudder centrally must be provided. This is best achieved by fitting tillers to both the trim tab and the auxiliary rudder, which can be locked in place. The rudder must be very strongly mounted onto the transom. The sideways loads can be enormous when the yacht is in big waves. The rudder stock will need to be at least 1 1/2 inches thick stainless steel to take these loads. I have shown an alternative rudder which is probably easier to make and will be stronger if the whole rudder is made by gluing sheets of plywood together. This would also have the advantage of being able to be lifted off its pintles for storing or working on. The rudder should be immersed by around 32 inches below the load water line. It should also extend above the LWL to cater for the yachts stern wave. A total blade depth of 40 inches is about right. The rudder should be 3 inches thick at its widest point, which must be just behind the pintle line. The leading edge will be rounded off and the rest of the blade including trim tab will taper to about 1/2 inch thick at the trailing edge. Overall the rudder will have a 15 inch chord. The balance area forward of the pintles or stock is 3 inches ( 20% ) and the trim tab is also 3 inches ( 20% ). With this type of self steering the yacht is put on course, the main rudder is locked centrally, then the self steering is engaged and adjusted to just balance the forces trying to push the yacht off course. PENDULUM SERVO (Design 4)
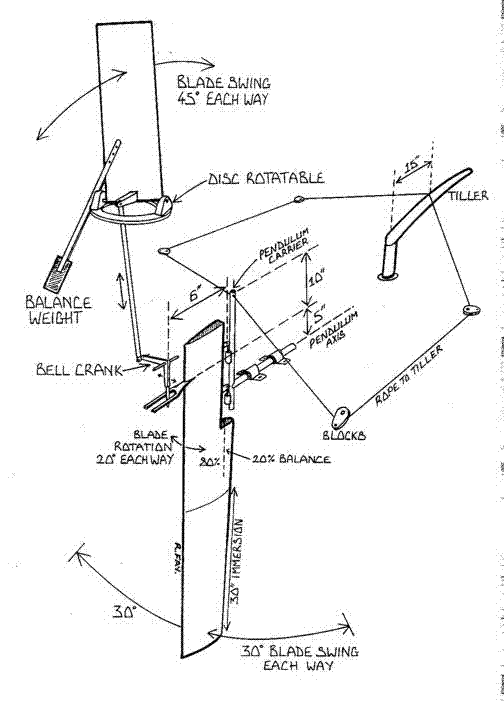
If you decide to opt for a pendulum servo type then you have chosen not only the most complicated gear, but also the one that is often considered to be the most powerful. So if you have a yacht that is heavy to steer, with an inboard rudder, perhaps this is the one for you. The pendulum servo takes its direction from the wind using either the vertical or horizontal air blades already described. This movement is used to twist a blade suspended over the stern. Depending which way it twists it will move either to port or starboard, rotating around its attachment point. This movement is transferred to the main rudder by ropes, steering the yacht back on course. The pendulum blade will have a chord of 5 inches. It will be immersed 30 inches below the LWL, the total length will be designed to suit the yacht, depending on the height of the transom. The blade will have a 20% balance. This means that 1 inch will be forward of the pintle line. Laminated plywood is a good material and should be around 1 1/2 inches thick above the LWL and can be tapered to 1 inch at its end if you wish. It should have a rounded leading edge, with its thickest point 1 inch back, then gently taper to the trailing edge. A horizontally pivoted air blade is best with this system as it is more accurate and gives greater deflection for small changes in course. A deflection of 45 degrees of the air blade must rotate the pendulum by 20 degrees. This will act on the aft edge of the pendulum about 5 inches above the pendulum axis and 6 inches behind the pendulum pintles to provide feedback. ( In this case feedback means that once the pendulum has swung 30 degrees it will realign with the water flow and exert no more force.) The pendulum must be able to swing 30 degrees, but a little more is better so that it isn't constantly hitting any stops. The pendulum carrier shown in the drawing needs to be very strong. One inch stainless bar, such as an old propeller shaft, or 1 1/4 inch stainless tube should be considered as having the minimum strength. Alternatively a pendulum carrier can be constructed from 2 by 2 inch timber or cut out from plywood and then use the gudgeons and pintles from a small cruiser or dinghy rudder as the pivots, (excess weight in this part of the system has no adverse effect). It rotates on a horizontal axis on the centre-line of the yacht. (Or as close as practical). The pendulum blade must be at 90 degrees to the waterline or angled a few degrees back at the base away from the flow of the water, (trailing). If the pendulum blade is angled forward at the bottom it results in uncontrollable oversteer. As the aft deck of many yachts slopes down towards the transom the aft mounting of the servo carrier may need packing to correct this angle. Ropes which go to the yachts tiller attach 13 to 15 inches above the axis of the pendulum. These tiller ropes must be very flexible 6mm dia. (multi-plat rope is best). The ropes must be guided by very free running blocks and there must be minimal friction in the system. The guide blocks need to have strong mountings as this system can exert very high loads. The ropes attach to the tiller approximately 15 inches forward of the rudder pintles. A method of releasing them quickly must be provided, for when you need to steer by hand. This can be achieved by attaching the ropes to the tiller with 'jam' cleats. On a yacht with wheel steering many people prefer to attach these ropes to a short tiller provided for just this purpose. Where the yacht has no tiller, the steering ropes will need to operate on the ships wheel. This is achieved by fitting a rope drum to the middle of the wheel and the steering ropes then normally need at least two turns around the drum. The ropes can both be led through guide blocks to one side of the cockpit, which helps keep the cockpit clear. The diameter of the drum normally needs to be around 7 to 9 inches for correct control. A method of releasing the drive from the drum to the wheel is needed. This can be achieved by constructing the drum as two discs. One is permanently attached to the wheel and the other rotates on a central bolt. To mechanically join them use a 'dog' clutch which is engaged by tightening the central bolt. Or alternatively a simple pin can be used to lock the drum to the wheel. LINKAGES & DESIGN
Having looked at the various types of self steering, there are some points regarding the linkages and general design that need to be considered. The rudder of a yacht is a compromise. It needs to be large enough for manoeuvring in harbours etc. Yet when the yacht is sailing a much smaller rudder is all that is required. This means that when the yacht is in a harbour around 40 degrees of movement is needed but when sailing a maximum of 15 degrees is all that is required. This large movement needed when manoeuvring generally means that any system that uses a trim tab on the main rudder will need to have a method of being disconnected from the trim tab tiller to accommodate these large movements. On all horizontally pivoted vanes the linkage must be capable of being disconnected from the trim tab tiller. This can be achieved by having either the bell crank or the fork slide to disconnect one from the other. The air blade and the connecting linkage of any type of self steering needs to be kept as light as possible, consistent with adequate strength. The reason is that as it becomes heavier it tends to respond slower due to inertia. The air blade will be strong enough if made from 4mm ply, don't apply too much paint as this dramatically increases the weight. Push/pull rods can be made from 1/2 inch dowel or aluminium tube and bell cranks can be made from 6mm aluminium or plywood. The general principles apply to all yachts, but yachts are all different so it is wise to build in a small margin for adjustment of the system. This can simply be done by drilling extra holes on each side of a pivot point, to adjust the length of a lever. Once the system is in use you may find that your yacht responds too quickly or too slowly, showing that the system needs gearing up or down slightly. With a small amount of adjustment built in this is easily achieved. In practice it has been found that different yachts only need the linkage to alter the amount of movement of the trim tab or pendulum by plus or minus 2 or 3 degrees maximum. If a system needs to deviate from the stated movements by much more than this, then something is wrong and the 'movements' should be checked. Experience has shown that using Bowden (push/pull) cables does not normally work well. They tend to stick, leading to erratic steering. It is acceptable for the wind vane to be set to one side of the yachts centre line. However when going to windward an offset vane will be disturbed by the air leaving the rear of the mainsail more on one tack than on the other. The air vane will need to be several feet above the deck to place it in relatively undisturbed air. Do not place it too high, such as on top of an aft gantry, as it can then become excessively affected when the yacht rolls. The drawings show a pin and fork linkage to connect the bell crank to the trim tab tiller. Although this appears to be a very crude system, it does work well and on examination has been found to show no appreciable wear after 30,000 miles, which actually represents a complete circumnavigation of the world. Any vertical bars or tubes that rotate and need to move freely such as the vertical wind vane, trim tab and rudder stocks, should sit on a pin end or ball in a cup to reduce friction and allow them to rotate easily. The bushes in the centre of rotating tubes or bars should be shaped internally to have the minimum area of contact and thus reduce friction. TO CONCLUDE Each of these types of gears have been successfully built by home builders and have controlled yachts in varying conditions from near calms to severe storms without any assistance from the crew. This has led to many short handed and family crews making remarkable passages that would not have been thought possible until recently. A deep understanding of the principles involved is not necessary. So long as it is kept simple and satisfies the basic principals that have been outlined you can build your own to suit your boat and your pocket. …………………………………………………………………………. MY PERSONAL CHOICE After sailing many thousands of miles. Using many types of wind vane steering, I became convinced that the trim tab system was the best. If the yacht was suitable. One of the main reasons for this choice is that there is very little strain on any of the equipment. On my last 32 foot yacht, the trim tab system actually steered us downwind in 60 knots and big seas with very little strain on the gear. I did nervously sit there ready to take over but never needed to. Therefore when the Fay range of yachts from 32 to 44ft were designed they all had transom hung rudders. This makes using a trim tab on the main rudder easy. If I had any other type of yacht without a transom mounted rudder, I would endeavour to use an auxiliary rudder with a trim tab. On my latest yacht ‘Ti Gitu’ which has wheel steering we use a trim tab on the main rudder. On short passages the trim tab overcomes the friction of the chain and cable type steering. For long ocean passages the quadrant on the rudder post, can be disconnected from the steering. This allows the wind vane to work easier and saves wear on the wheel steering gear. Linking a small tiller autopilot to a trim tab makes very inexpensive electronic steering possible on even large yachts. ---------------------------------------------------------------------------------------------------------- Here at Fay Marine we are dedicated to increasing the possibilities and pleasure that can be achieved from long distance sailing and it is our deepest hope that the information supplied in our plans and design papers will help more sailors to achieve their dreams. Paul Fay. © Paul Fay 1998 These plans are for the private individual or club to construct a steering unit. Permission must be obtained from Paul Fay to use these instructions to build commercially.
|