Links
| Please donate if you find this site useful. |
| Fay Marine |
| Yacht Plans |
| Anchors & Anchoring |
| Batteries |
| Battery Desulphation |
| Diesel Fuel |
| Electricity |
| Engines |
| Free Fire Design |
|
|
|
|
Junk Rig
There has been a great deal written about the Westernised Junk rig and there are some excellent books on the subject. There is also a lot of rubbish written and talked about the rig, some of which we have tried and found it to be wrong. Therefore here is some of our writing of our experiences of the rig on Ti Gitu.
We have sailed Ti Gitu well over 25,000 miles including a double Atlantic crossing. Caught in a storm we broke both our wood masts and they were replaced. We have also tried and are still using the latest fashion of 'cambered panel' sails.
There are two books worth reading if you are interested in the rig, these are Practical Junk Rig by Blondie Hasler and Jock McCleod and Junk Rig by Derek Van Loan. There is also the Junk Rig association with a discussion forum on the internet. Also there is a Yahoo Junk rig forum which does have a lot of information on it, however due to way it is run and the way anybody with no experience is allowed to pass stupid comments I no longer attend this one.
Click on these links to find what you want:-
Making a Cambered Panel Sail Work.
New masts for Ti Gitu. (coming soon)
------------------------------------------------------------------------------------------------------------------------------------------------------------------------------------------
Making a Cambered Panel Junk Sail Work
I have been interested in the Junk sail for many years, and after my son experimented with this type of sail we made a four foot long model of a schooner to test sail it. We then joined the Junk Rig Association and went on some of the rallies, which gave us the opportunity to sail on a number of junk rigged yachts.
The rig was impressive, and when Mo and I decided on a new yacht we chose a Fay 40 with a junk schooner rig to become our travelling home. The yacht was built and launched in 2002.
Ti Gitu is 11.9 metres long, 4 metres beam and has a draught of 1.5 metres. She has twin keels and a large skeg in front of the rudder. Built of steel and having four tons of ballast the designed weight is 13.5 tons but with all our possessions aboard and fully loaded with water and fuel the weight increases to 15 tons.
The rig was designed to be simple and almost exactly followed the Hasler and McCleod recommendations. The rig is a schooner and both sails are exactly the same shape and size. The aft or main sail is simply rigged a little higher than the forward to give head room over the cockpit. The masts were originally grown timber with dimensions directly from H & M's book and checked against both Derek van Loan’s and Skene’s Principals of Yacht Design recommendations.
We were happy with the rig. It was designed to be simple and worked reasonably well. We want to continue sailing easily as we progress into old age and the rig suited us well.
In the Balearics Ti Gitu was caught in a sudden vicious gale while anchored and with the cliffs a couple of hundred metres astern we motor sailed out of the anchorage and we were knocked over by three tremendous gusts which damaged the top of each mast. I am a qualified yacht surveyor and was horrified by what the insurance company’s surveyor said. It became clear to me that insurance companies and general surveyors have little or no knowledge of the Junk rig. However our insurance did eventually agree to pay for new masts and Ti Gitu now has steel masts from a company in Nottingham UK called Fabricat. The masts are actually based on street lighting poles which Fabricat heavily modified for use as masts.
While fitting the new masts Mo cleaned all the marks on the sails from the tallow and bee’s wax which we treated the old wood masts with. One of the large cleaning liquid manufacturers recommended one of their products as being suitable and it worked well. So well that two years later the sails began to fall to pieces and new ones were needed.
There was a lot of talk about how cambered panels improved the performance and as it initially appeared that having cambered panels would only improve the rig I spent the summer discussing sail shape with various people and experimenting with camber on a quarter-sized panel . We decided on 8% camber for the four lower horizontal panels. Then 6% for the upper horizontal and two fan panels. The outline shape would still follow the H & M recommendations. The cost of having them made for us was more than we wanted to pay and so we ordered a Sailrite machine and everything else needed and made our own suite of sails.
We have found that there are a number of problems when changing from a standard Hasler and McLeod flat rig to a sail with cambered panels. Those of us who are sailing long distances rely on the information supplied by the sailors who are doing most of the experimenting with improving the junk sail. However, generally they are only sailing short distances and I notice that in some of their writing they accept small problems which to a long distance vessel can become major. This is not to detract from what they are doing at all, it is just to point out that there can be vast differences between the needs of a yacht sailed at the weekend and an ocean going yacht.
The problems we found.
Ti Gitu’s first test sail with the new cambered panel sails showed that the loads transferred from the sail into the yard and battens are totally different to the H & M design.
1/ Even in light winds the yard bent visibly. With a cambered panel sail the loads are carried at the luff and leach of the sail rather than being fed in along the length of the yard.
2/ As the panels are no longer flat, each panel will form a diagonal crease across it and Hong Kong parrels are needed to keep each panel in shape. However, the Hong Kong parrels bend the battens.
3/ The sail no longer stacks as designed by H & M. This causes the sheet to become caught around the boom and any stacked battens when raising the sail and also when gybing.
In strong winds it all became alarming and we realised that the yard and battens needed considerable strengthening.
Planning an Atlantic crossing from Spain, suitable aluminium tube was sought. Working in a country where you do not speak the language can be very difficult and we had to settle for what we could obtain. Our original yards were laminated timber and the battens 35mm with 3mm walls. We managed to obtain 80mm x 2.5mm tube for the yards and 50mm x 2.5mm for the top three battens. We could not find anodised tube so had to settle for plain tube.
As you can see from the pictures, I made the new yards really strong by using one of the battens we were replacing to spread the load into the larger tube. A section of ‘D’ shape dinghy fendering is riveted on where it touches the mast and all the brackets were made on board. The yards are bolted together but it would have been much better to have them welded. However, that proved impossible locally. The yards have proved to be strong enough and are only slightly heavier than the original wood yards.
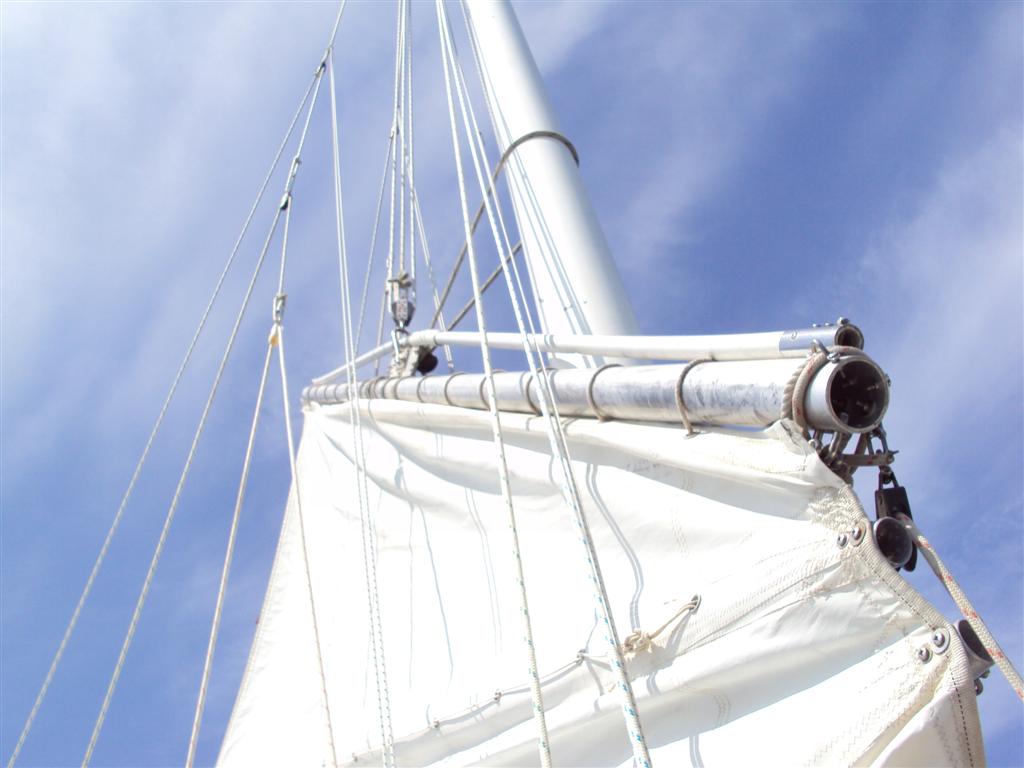
The yard and how the sheetlet is attached to a batten.
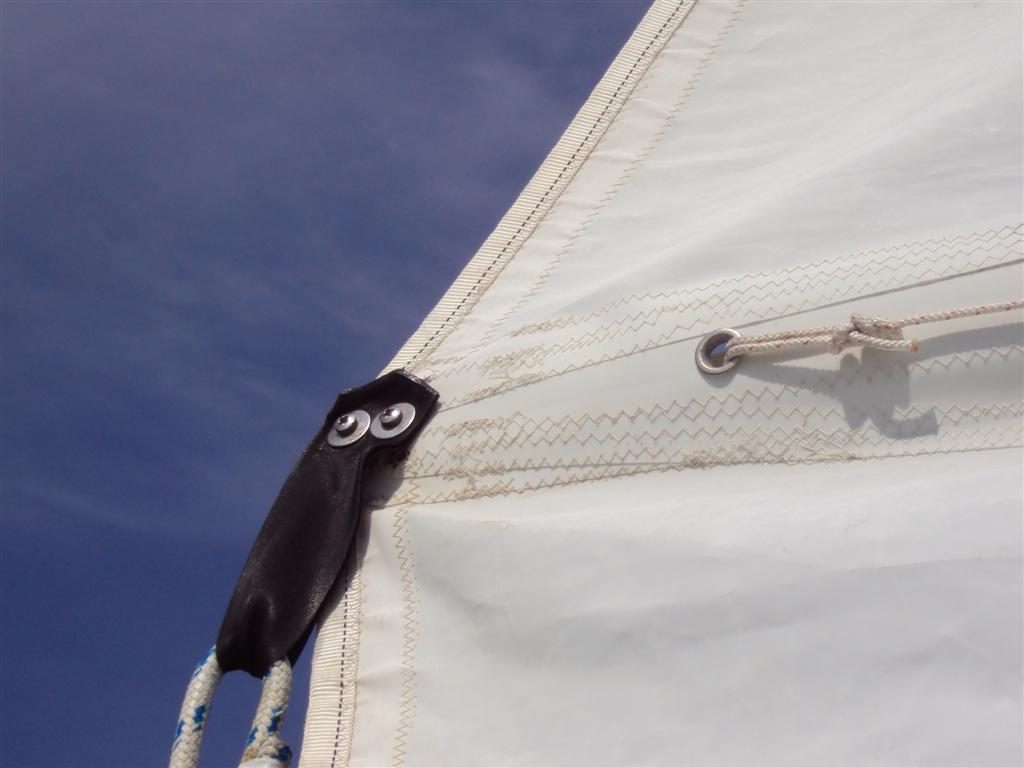
The top three battens were replaced. Originally there were stainless steel fittings at each end of the battens to facilitate bolting the sail to the batten with four bolts and penny washers. I decided to simply attach the sail with two bolts and washers straight into the tube. That has worked fine. To attach the sheetlets a piece of webbing is used also bolted on. This has proved to be reasonable but I believe that a better method is to attach the sheetlet inside the batten and use a short section of plastic tube where it exits the batten. This will tend to straighten as the sheet becomes slack and ‘throw’ the sheet clear of the leech of the sail when gybing, helping to prevent the sheet fouling the leach.
The top two battens, which do not need Hong Kong parrels, have been fine, however the third and lower battens still bent alarmingly with the third taking on a permanent bend. These Hong Kong parrels are a diagonal rope from the front of one batten and tied to the one below a few feet back forming an angle of 45 degrees or more. They are needed to keep each panel in shape and prevent a heavy diagonal crease from forming. A flat panel does this naturally.
Despite being very dissatisfied with the new sails Ti Gitu crossed the Atlantic both ways with the rig in this condition. I tried to discuss the problem on the Yahoo junk rig forum and a few suggestions were forthcoming - such as a luff hauling parrel to help the sail set without HK parrels. It did not. In fact no suitable remedy was forthcoming. ( Actually it became clear that some of the armchair sailors who frequent that forum haven’t a clue what they are talking about and can be dangerously misleading. I don’t attend any more, preferring the JRA site. ) We also met another Junk rigged yacht who had cambered panels and had found the same problems as us. At that time we all agreed that Hong Kong parrels are a bad thing. He was sailing around without them as they kept breaking his battens. This meant that his sails had the inefficient, unsightly diagonal crease, but no longer broke battens.
It wasn’t until we were back in the UK that I began to regain my interest in sorting the sails out.
I found was that when the initial discussions were taking place I had not been told that the lower leech and boom needed shortening to help stop the sheet fouling the sail when hoisting and gibing. Therefore we shortened the boom by 18 inches and the batten above by 9 inches and re cut the sail to suite. This helped.
The Remedies.
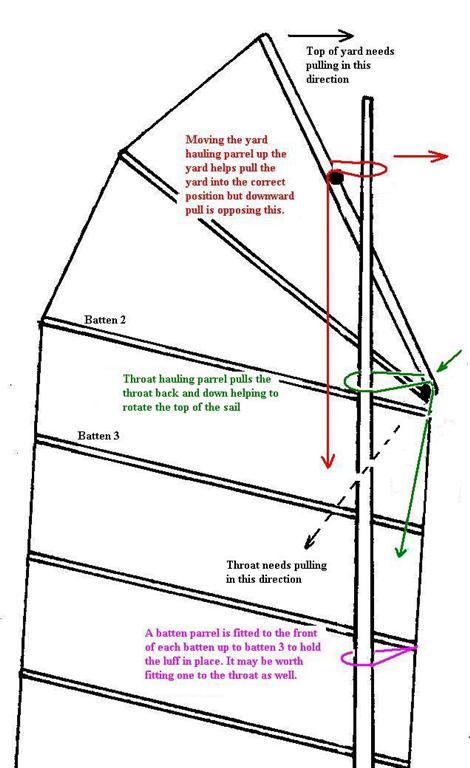
1/ It became clear that if the top section of the sail could be held in the correct position the rest would hang without the diagonal creases.
This can not be emphasised enough. For the cambered panel junk sail to work properly the top or fan section must be held in the correct position, then everything else can follow correctly.
This could be achieved by hauling the throat or front of the fan section of the sail down and aft. I tried a two part throat hauling parrel operating on the yard and top two battens. It was obvious that this helped enormously. However the strain on this parrel was excessive and I found that the friction of this rope going round the mast twice was so much that a single part was nearly as efficient.
In particular on the forward mast where all the control ropes have to be fed through leads along the deck, the two part throat parrel had enough friction to oppose the yard parrel. This meant that it became very difficult to haul the yard to the mast. However a single part throat parrel could be overcome by the single part yard parrel.
2/ To help stack the sail we tried fitting a pair of luff hauling parrels. One to the lower battens and one for the upper. As the sail was lowered the parrel was hauled in which forced the battens backwards to stack as they should. This did help but later, once the top of the sail was in position and standing luff parrels fitted, these were discarded.
At this point having two sails exactly the same was useful. We could try something on one and compare it with the other while actually sailing.
3/ The yard was being lifted from exactly the middle. To try and have the sail hang better the lifting point was moved 8 inches back. This made a small difference which can be seen when the sail is being hoisted, the top of the sail hangs a little better. The differences may be only small but it appeared that each small advantage needs to be taken when dealing with this type of sail.
4/ I later realised that there is enough distance between the throat and the mast for a pulley.
Our throat hauling parrel now goes from the deck to a block on the forward end of the yard. Then through a block between there and the mast and back to the yard where it is tied off. From the block between the yard and mast a rope goes around the mast and is fixed to the front of batten 2. This gives advantage without the friction of the parrel going twice round the mast.
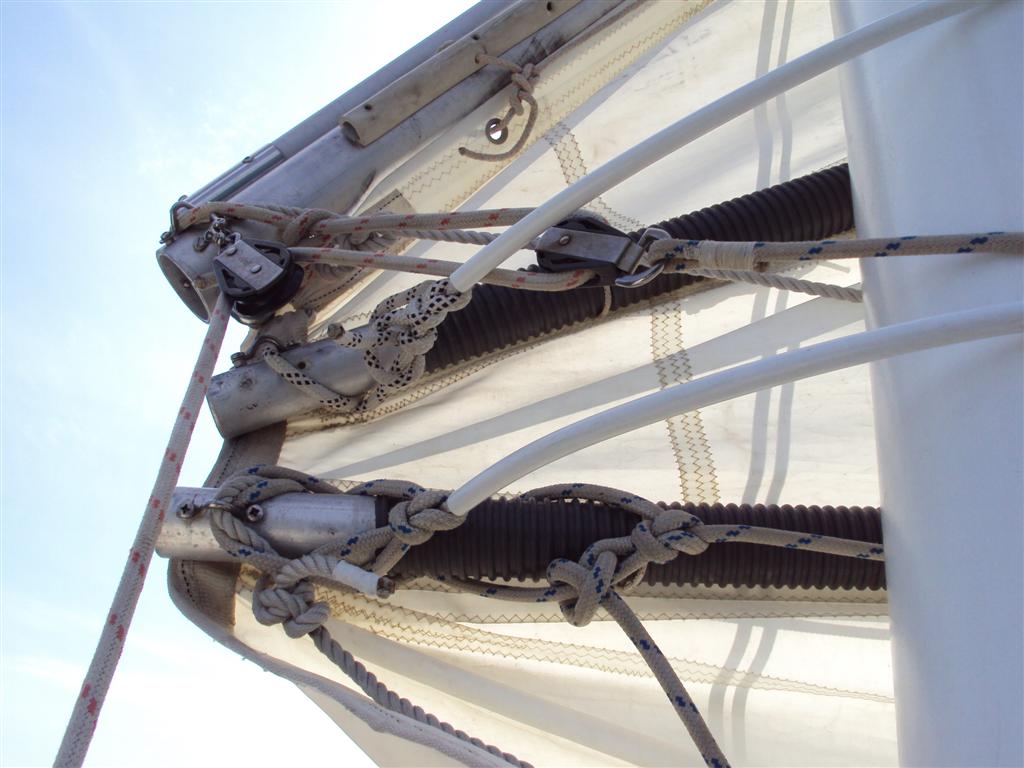
The throat hauling parrel.
5/ The yard hauling parrel was also moved aft / up on the spar. Once the yard is raised, moving the parrel aft / up was working to help haul the top of the sail into a good position. I did try moving it further but it was apparent that it would chafe on the halyard. This chafe is one of those small things that does not worry the shorter distance sailors but could be a disaster on an ocean crossing. I therefore tried it as high as possible but where it would not chafe. The only problem with this was that it could be difficult to judge when the yard had been hauled in enough. With the original system we simply pulled the yard parrel until the block was nearly touching the mast and this was the correct position. At this point we decided that this was easier and so despite losing a fractional advantage we returned to this system for a while but did move the parrel up the yard again later.
6/ This was all tried on the aft or main sail. The Hong Kong parrels were slackened and we went and test sailed the rig. A close examination of the following photograph shows that the aft sail is setting well while the foresail, which does not have the improvements is not peaked up so well. It has more creases and just look at how the HK parrels are bending the battens.
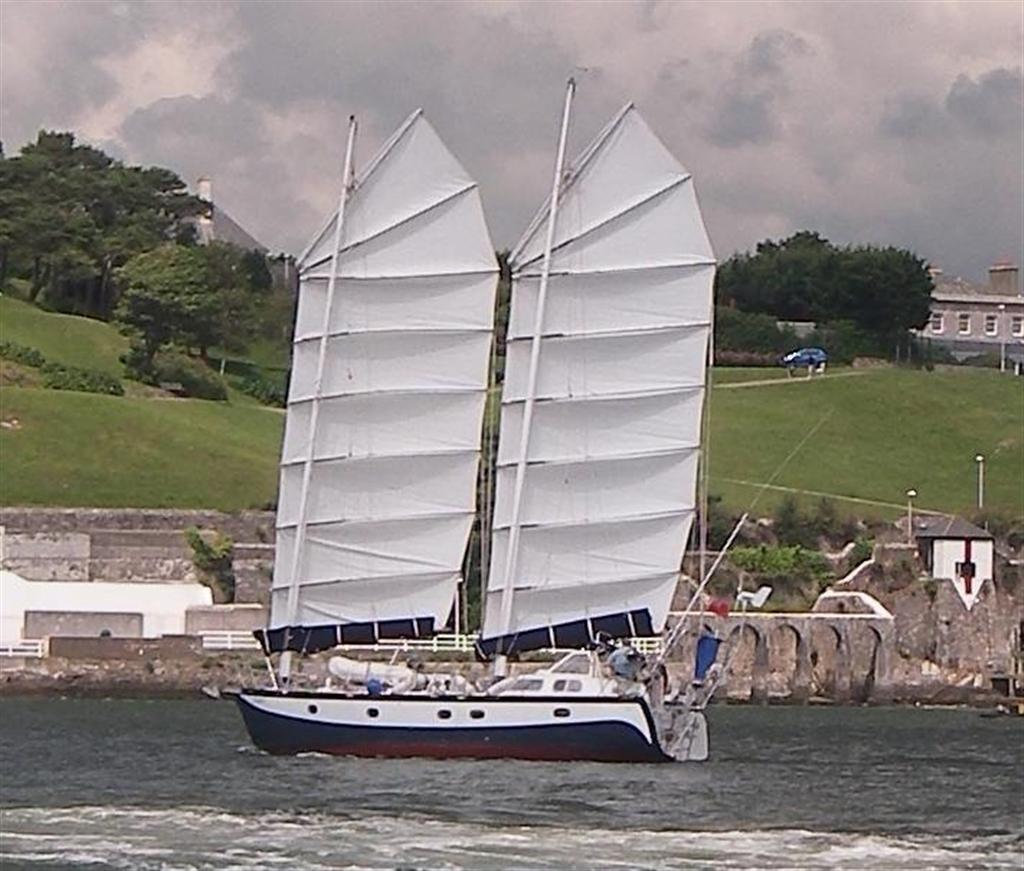
The aft sail is setting well but also notice that the load is bending the top of the mast a little. This only happens with the full sail set. Once it has been reefed a little the mast no longer bends.
As this only happens with the full sail, in light winds, I am not too worried about this. However, it appears that when we damaged Ti Gitu’s masts this was probably because in our haste to clear the anchorage we did not fully pull the yard into the mast. That meant that the halyard was pulling partially sideways on the top of the mast instead of directly perpendicular. As we were knocked over this bent the top of the mast excessively ‘springing’ the top of the mast. After that experience we make sure that our yards are always pulled into the mast and the halyards perpendicular.
7/ I wondered how it would work, if, instead of having a throat hauling parrel going round the mast, the throat of the sail (front of the yard) was just pulled down. This needed enormous power so was discarded. However I did realise that another small advantage could be gained by rigging the throat hauling parrel with the fixed end on batten two (from the top) then passing between the sail and mast to a block on the forward end of the yard, then down the mast. This would tend to pull the front of the yard down as well as back – exactly what we want.
8/ Ti Gitu has normal batten parrels to hold the sail close to the mast. However it seemed that a parrel on each batten going from the forward end around the mast and back to the forward again would hold each batten in place. I thought that parrel beads would be needed but know that whenever these have been tried by others they do not seem to work well on a junk rig. Much of the rope on Ti Gitu is 10mm and I found many years ago that the 12mm flexible water pipe sold in rolls for domestic systems is a snug fit over this size rope. It comes grey or white, therefore all of our fixed batten parrels have white plastic tube covering them and it reduces friction against the mast enormously.
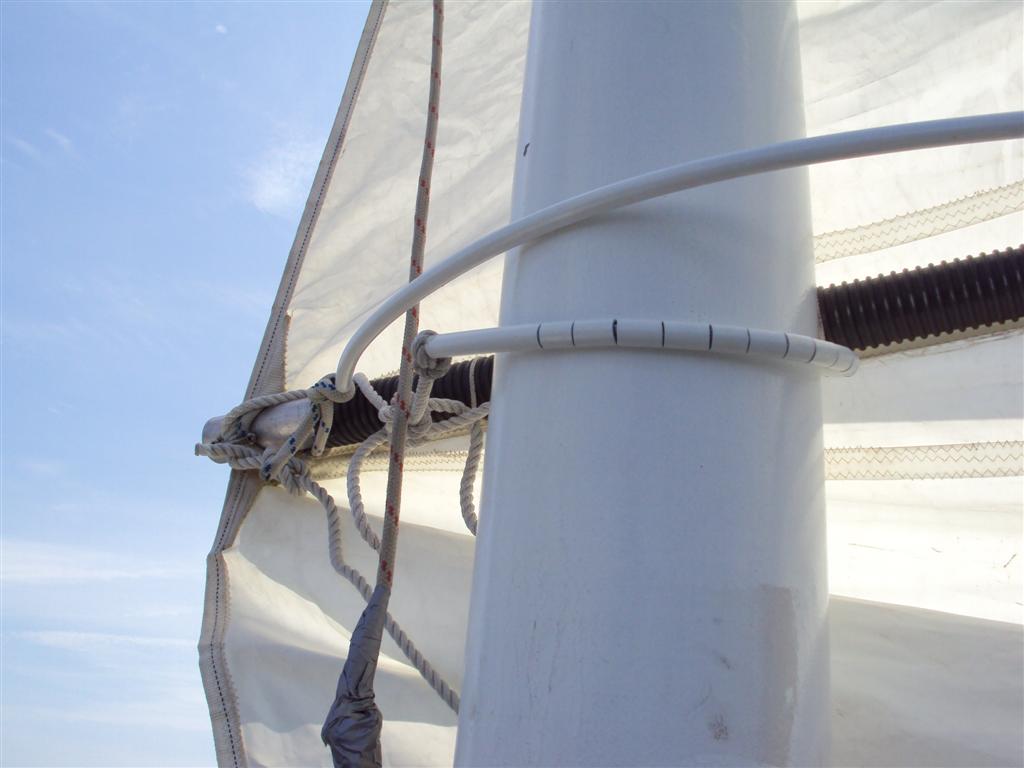
Batten parrels with plastic tube over.
I decided to try this for the new batten parrels. It needs to take on a tight turn to go round the mast so I cut the tube half through at each 1 inch along it’s length and this has worked well, allowing these parrels to slide easily as the sail is hoisted and lowered.
These parrels have helped to hold the sail in position both when sailing and when the sail stacks. Although the sail still does not stack perfectly since we fitted them and sailed Ti Gitu they have stacked well enough not to foul the sheet any more.
Advantages.
1/ The cambered panel sails are undoubtedly more powerful than flat sails. Especially in light winds.
2/ They will point slightly higher in light winds. However, for full advantage the sheet will need hauling to windward on a track. (Another complication).
3/ Keeping the boat ‘in the groove’ while going to windward is less demanding. The camber allows a little wandering off course without the sudden drop in power of a flat sail.
4/ With the top of the sail being held in the correct position fewer running control lines such as luff parrels seem needed. (Unless you want to continually play with the set of the sail.)
5/ When running downwind (‘goose winged’ or ‘wing and wong’) the sails seem less likely to gibe. This is perhaps because the fabric can slightly collapse without the yard and battens moving.
6/ With the top of the sail held in the correct position the load on HK parrels is negligible and eventually we may find that they are not needed at all.
Disadvantages.
1/ The sails are considerably more difficult to make and therefore expensive. (That is if you use the shelf method which seems to be a must if using reasonable weight of normal sail cloth)
2/ The loads on mast and spars is different and greater. Needing considerably stronger gear.
3/ There will be more chafe of the sail against mast and ropes as it bellies out. However after 12000 miles we have very little chafe caused by this.
4/ The added throat hauling parrel going round the mast will cause more wear to the mast. Also as it is opposing the yard parrel and putting this under added load this will cause extra chafe. This will damage paint and varnish etc. and may begin to cut into a wood mast after time.
5/ Using the extra batten parrel means that it takes a little longer to initially set the sail up. I did find however that as our masts are tapered I was able to set these parrels up by measurement. On ours I set them at 19 inches between front of batten and the mast at the lower batten and increased it by ½ inch on each batten up. Each sail will be different but once the measurement is known it should not change.
6/ Setting the sail up each time it is raised or reefed is critical. Knowing just how much to pull the throat for each wind strength will need to be learnt or adjusted while sailing.
7/ We have found that the yard parrel must be very strong. Originally ours were 12mm but on one mast we had tried 10mm which had been fine. As this is now under extra load we have had to replace it with 12mm again as it stretched too much.
Conclusion so far.
To make a cambered panel sail work, attention must be given to making the top of the sail set in the correct position. This is something which only really becomes apparent once it has been done. Trying adjust the sail from lower down just does not work and I include HK parrels in this. What is needed is at the top of the sail to pull the front down which by leverage along the yard is pulling the back up.
This rotates the top into a good position.
As the wind increases and the sail is reefed it becomes easier to set the sail with the throat hauling parrel. This will be because there is less load to overcome.
Latest Developments. To the end of 2012.
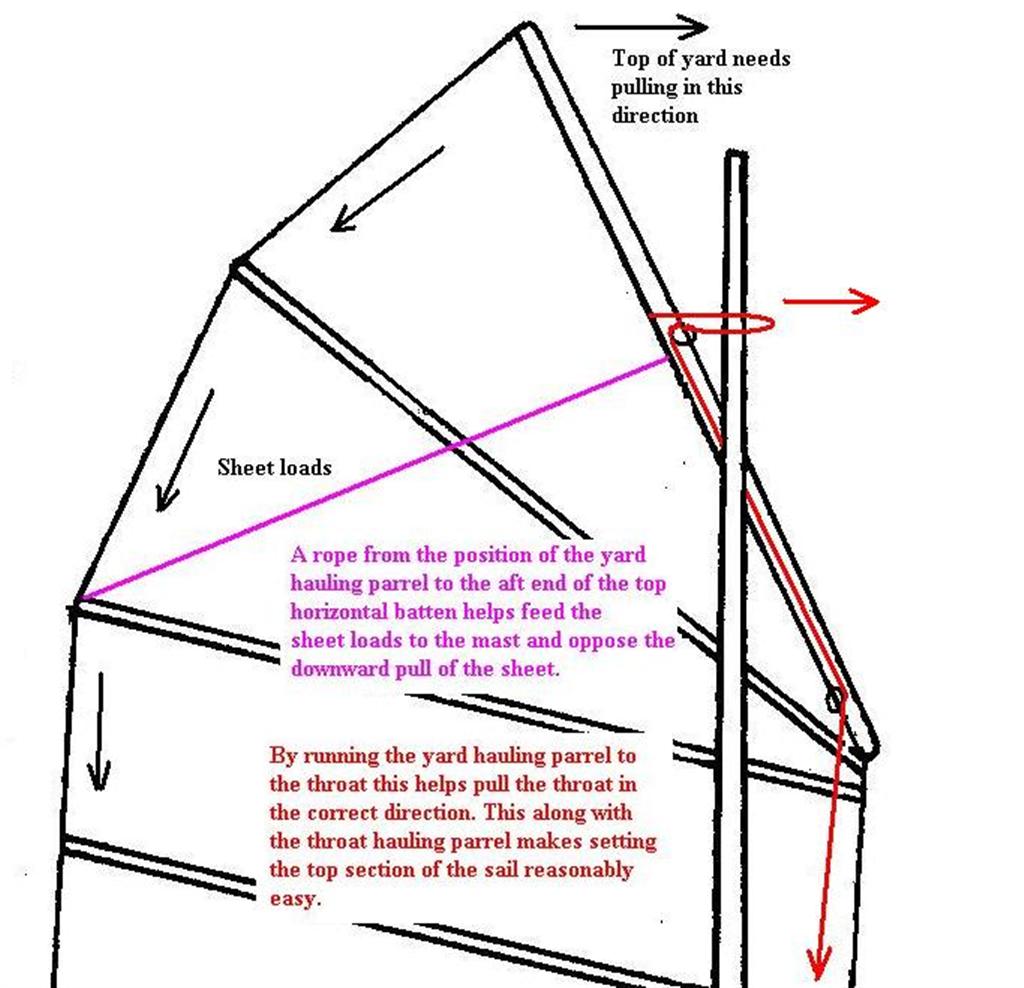
So things were beginning to look reasonable but some of the loads were higher than one would like. At this point I just sat and studied a picture of Ti Gitu sailing and thought about the loads and which way they were going.
I realised that the fall of the yard hauling parrel was working against what we are trying to achieve.
I also had a good look at the yard and decided that we could move the yard hauling parrel up the yard and that by twisting the lower halyard block it would not chafe against it. I also realised that if it was found to be of advantage to raise the yard parrel even higher on the yard then a stainless bar could be inserted between the yard and the halyard block to stop chafe between the ropes. To this end the yard hauling parrel fixing point was raised up the yard.
We are also experimenting with a further development, which we all seem to have overlooked – the point at which the yard-hauling parrel imposes its action on the yard. By moving this to the front of the yard we can achieve two objectives. First, to pull the yard into the mast. And second, to pull the front of the yard down and leech up, thereby reducing the load on the battens. In order to achieve this we are experimenting with a block fitted at the throat so that the yard hauling parrel rope now goes to the front of the yard before going to the deck, which helps to pull the front of the yard into the correct position.
This has eased the load on both the yard hauling parrel and the throat parrel bringing the loads to a more acceptable level.
It was also clear that all the loads of the sheet were going to the top of the yard. At the moment we are experimenting with a rope from the yard at the point where it is close to the mast and the aft end of the top horizontal batten. This helps the loads to be taken to the mast rather than pulling the top of the yard down.
There are a few other things left to for us to try such as :-
1/ Instead of having a throat hauling parrel perhaps a standing throat parrel would work. This may need a more powerful yard hauling parrel as it will become this, working against the throat parrel, that is the only thing hauling the top of the sail into the correct position.
2/ Moving the halyard or the yard hauling parrel aft along the yard may help some more.
We are often asked if we would have cambered panels again and until recently we said an emphatic no, believing that they had no place on a long distance yacht.
However, it has taken us 12000 miles and two Atlantic crossings to really begin to understand these sails and had we known what we were letting ourselves in for then we would certainly have stayed with flat sails.
Now that we have begun to overcome the disadvantages we are having second thoughts and perhaps in another few thousand miles we may even begin to like them.
2013 Developments.
This is to follow.